MerchantsMetals Chain Link Fence Installation Guide
Whether you’re looking for instructions on building a chain link fence or a specific guide to installing MerchantsMetals fencing, you’re in the right place. Download a copy of the directions or read on to find out what it takes to install chain link fencing.
Determine Fence Layout
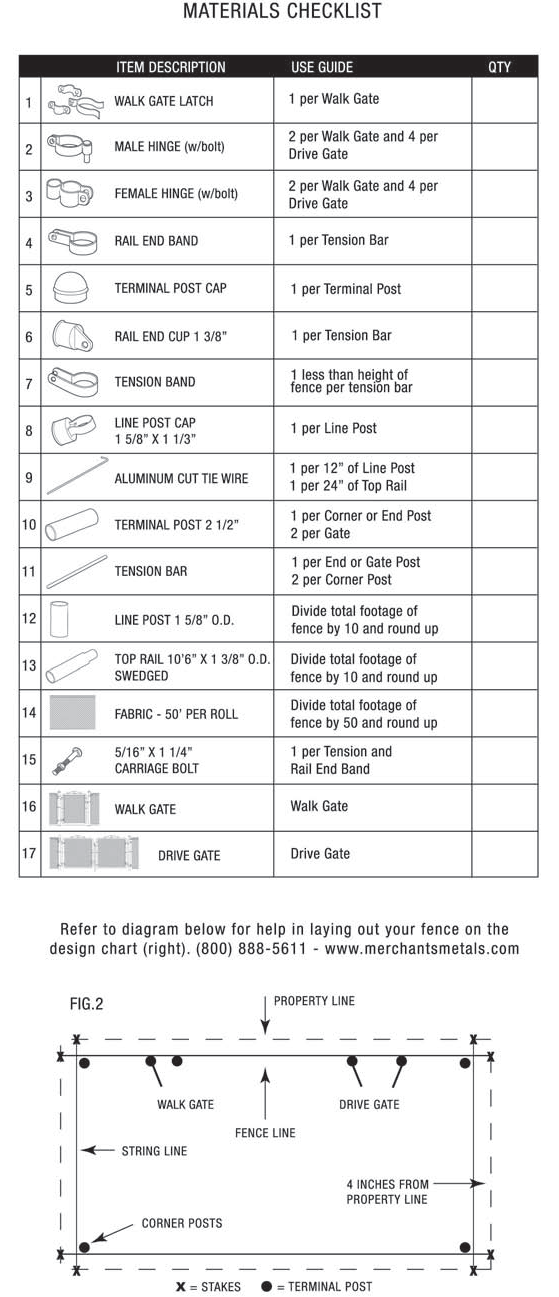
Determine property line and fence layout as illustrated in Fig. 2. Starting 4” inside the property lines to avoid encroaching on adjacent property, drive in stakes to establish the fence layout. Run a string around the stakes to mark your fence line and measure to determine quantity of chain link fabric and components required. Make sure to check with local utilities for underground cables or pipelines.
Locate Terminal Posts
Mark corner posts at the intersections of the string line. Mark end and gate posts at desired locations along string line. Note: Set gate posts to exact dimensions of standard gates below. All gate hardware has been included in measurements for gate openings.
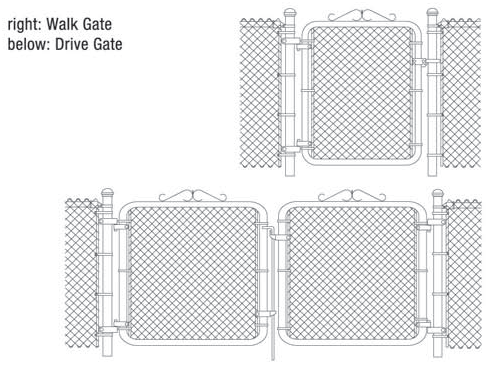
Walk Gate dimensions: 39″, 42″ or 48″
Drive Gate dimensions: 10′ or 12′
#1 Dig & Set Terminal Posts
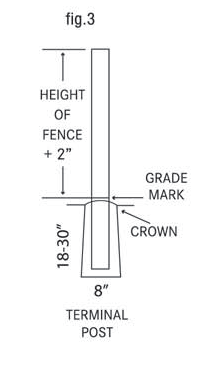
Dig holes for terminal posts (corner, end, and gate) at the marked locations. Mark the grade (ground line) on the terminal posts. Measuring from the top down, add 2” to the height of the fabric and mark post. (Height of fence + 2”= grade mark).
Mix concrete per manufacturer’s specifications.
Caution: Too much water can weaken concrete and may cause cracking.
Place posts in holes and fill with concrete, completely surrounding the posts. Use a level to ensure posts are plumb. Use a trowel to crown the top of footer for drainage. Look down the fence line to ensure the posts are straight. Adjust alignment as necessary (Fig. 3).
Note: For exact diameter and depth of terminal posts, consider climate and local soil conditions. Maximize footer size on gate posts.
#2 Dig & Set Line Posts
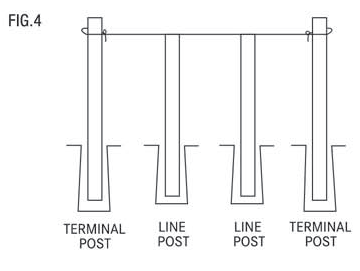
Remove the string from the stakes and tie it around the terminal posts, keeping the string on the outside of the post and 4” below the top of the post. Be sure the concrete has hardened enough so that the posts remain plumb. See Fig. 4 below.
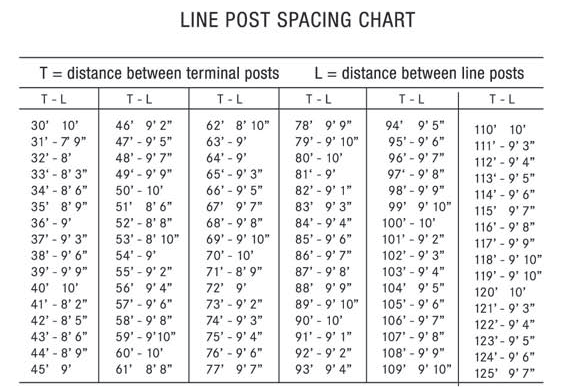
Measure the distance between terminal posts. Using the line post spacing chart, determine the location of each post. If setting posts in concrete, mark and dig the line post holes. Make sure the hole is off-centered on the string line so that 2/3 of the whole is on the inside of the string (Fig. 5). If driving line posts, mark post locations.
Mark the ground line on the line posts. Measuring from the top down, subtract 2” from the fabric height and mark line posts (Height of fence -2” = grade mark). See Fig. 6 above.
If setting posts, place posts in the hole on the inside of the string line and fill with concrete. Use a trowel to crown the footer for drainage. Check with a level to ensure the posts are plumb, keeping the top of the line post even with the string (Refer to Fig. 4).
Caution: Grade line must never be buried.
Note: If not setting posts, drive posts into ground at marked locations. Look down fence line to ensure the posts are in alignment (straight), adjust as required.
#3 Mount Fittings to Terminal Posts
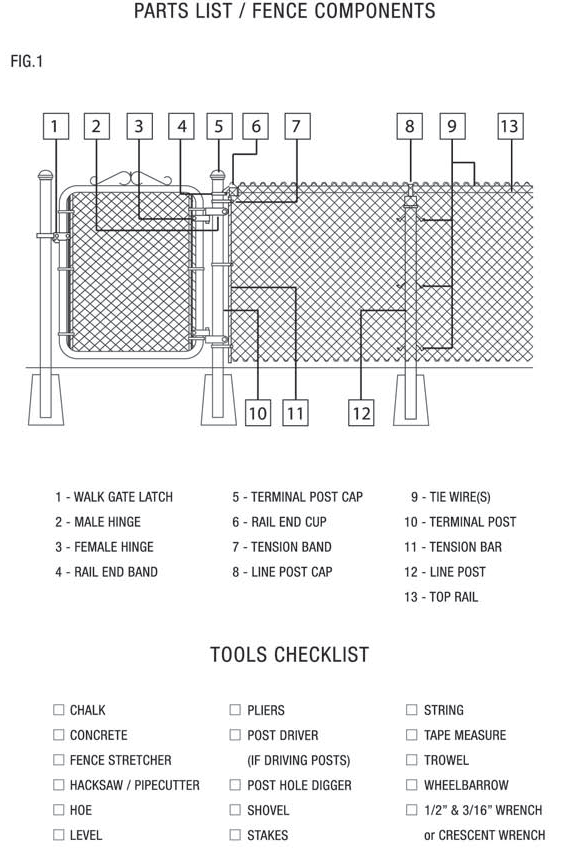
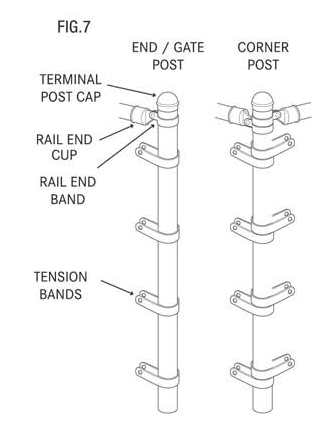
Remove string. After concrete has hardened, slip tension and rail end bands on terminal posts.
The tension bands (flat side out) should be spaced evenly. Do not spread or distort bands. All bolt heads for tension bands are on the outside of fence and the threaded ends are on the inside.
Next, install terminal post caps.
See Fig. 7 below.
#4 Install Top Rail
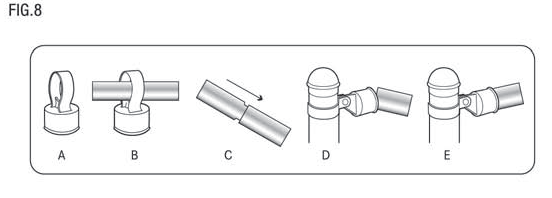
Install the line posts caps (A & B). They are set with the flat side toward the outside of the fence. The end of the top rail fits into the rail end cup attached to the terminal post (E). Join the top rail together by sliding the small ends into the large ends (C). Go to the next terminal post, measure carefully, and cut the top rail to fit. Then, with rail end turned up at a 45 degree angle, place top rail into rail end cup (D) and snap down for a snug fit.
#5 Hang Fence Fabric
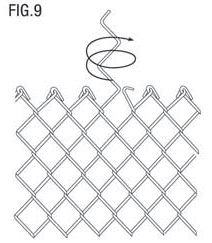
After assembling framework, unroll fabric along fence line starting at a terminal post. If more or less fabric is needed, an additional amount can be added or removed as shown in Fig. 9. Fabric should be on outside of all posts with edge at top and loosely attached to the top rail by tie wires. Slide tension bar through diamonds at the end of the fabric and attach to terminal post using tension bands with nuts and bolts.
To REMOVE fabric: unbend the top and bottom ends of wire at the desired location. Twist this wire in a corkscrew fashion until it comes completely apart.
To ADD fabric: Remove end wire from one end of fabric (See Fig. 9), then fasten both sets together with the wire you just removed by using the same corkscrew method in reverse.
Note: You may need to remove a second wire on the same end to attach the two sections.
#6 Stretch Fence Fabric
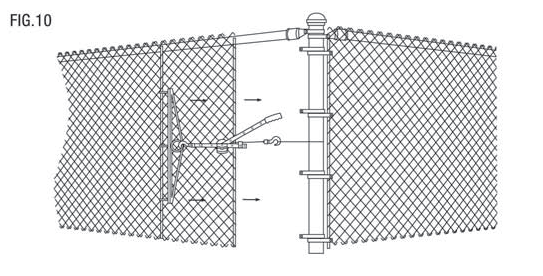
Fence fabric should be stretched from the terminal post already attached, toward the opposite terminal post. Insert tension bar approximately 5’ from the terminal post and attach fence stretcher to bar. See Fig. 10.
As you stretch the fabric, test it for tension. It is stretched enough when it gives slightly. After fence fabric is sufficiently tight, remove the excess fabric (Refer to Fig. 9). Insert a tension bar and connect to the post with tension bands, nuts, and bolts. Then fasten the fabric with tie wires, spaced approximately 12” apart on line posts and 24” apart on top rail. Proceed to tighten all nuts and bolts.
#7 Hang Gates
Apply male hinges to desired gate post. To prevent gate from being removed, the bottom hinge pin should be facing upward and the top hinge pin should be facing downward. Set hinges to allow for full swing of the gate and align the top of the gate with the top of the fence. Tighten all hinges securely. Use the same procedure on Walk Gates and Drive Gates. For more detail, see below.

